1. Suggested By: Phauxe Kitsune
Raise your Strength to 7; Perception to 6; raise Endurance, Charisma, and
Intelligence all to 7; raise Agility to 8; leave Luck at 5. Choose Big
Guns, Energy Weapons, and Barter for your tag skills, and Skilled and
Gifted for your Perks.
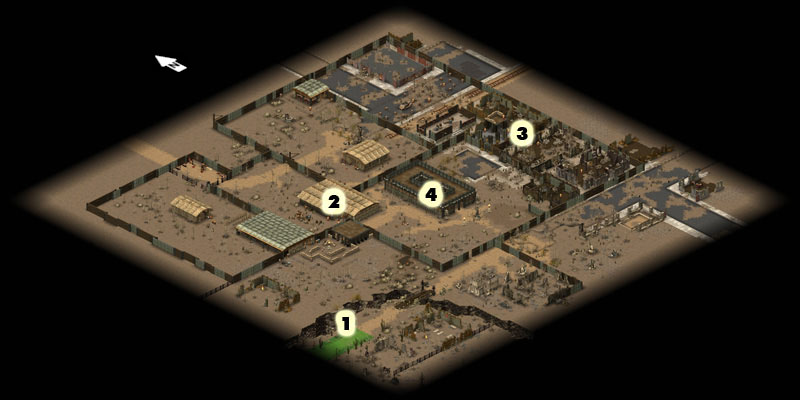
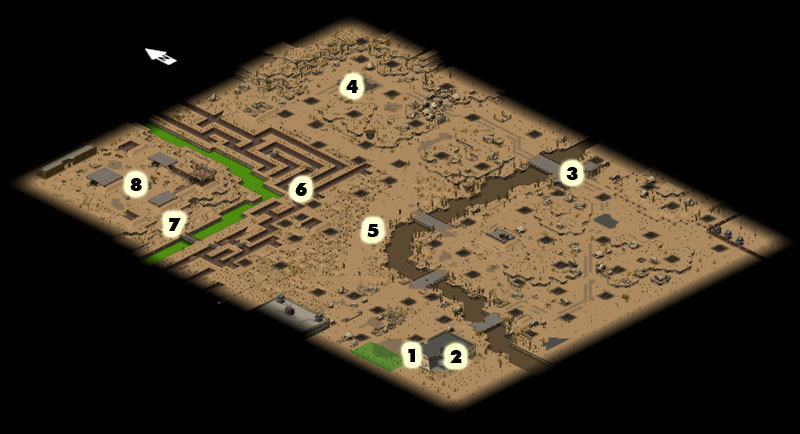
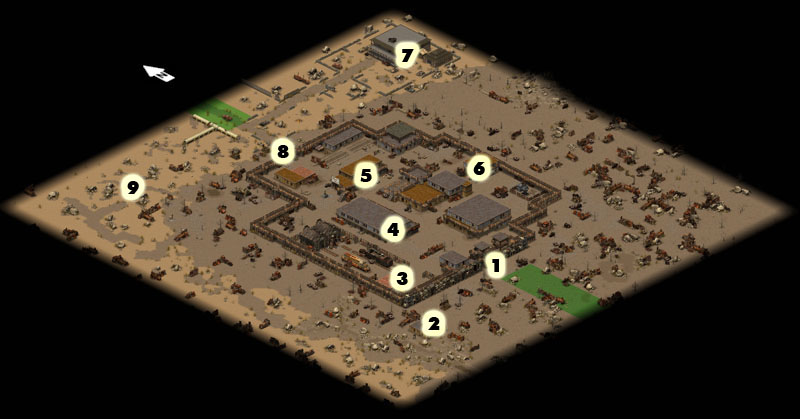
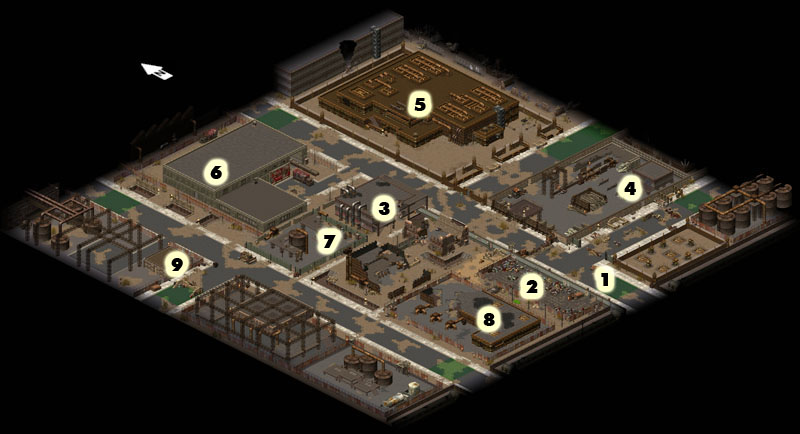
1. Entry / Exit
2. Location of Hostages
3. Ruins
4. Raider main hideout
1. The first thing you should find here is the village elder along with some other tribals to the southeast. Talk to the elder to find out more about your quest. You will also learn that you have to rescue some villagers that are being held hostage. There also is an encampment in a ruined building due north.
2. Go north over the bridge. Here you will probably encounter a light patrol or two which can easily be taken out.
3. Proceed to the tent in the north now. You can find a much needed key there. Then go outside of the tent. Just to the south you will find a door that is locked. Luckily, you just picked up the key, so unlock the door and proceed.
4. Go through the building now and eliminate all enemies. Follow through the area you are now in (there is only one route) until you come to the brahmin. The building by the brahmin is where the villagers are being held. You might want to save here. After you enter the building and once the enemies see you, they may start attacking the villagers. It is important that the villagers are not killed, so proceed with caution.
5. Proceed out the east exit of the building. Kill the patrolling raider and enter the tent to the east. There is a raider that is hidden until you enter the tent. Kill him for a speargun. Then go to the building in the northeast and use the key you obtained earlier to unlock the doors. Now proceed east. You will go through the ruins of a few buildings that are fairly well fortified, but easily manageable.
6. After the enemies here have been eliminated, go west. Here you will find an open space with a building towards the middle. The raider leader Horus can be found in this building. Kill him and everyone else there and the mission will be completed.
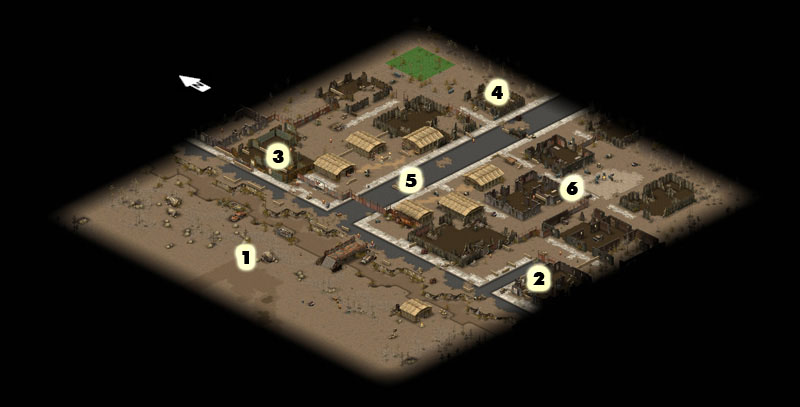
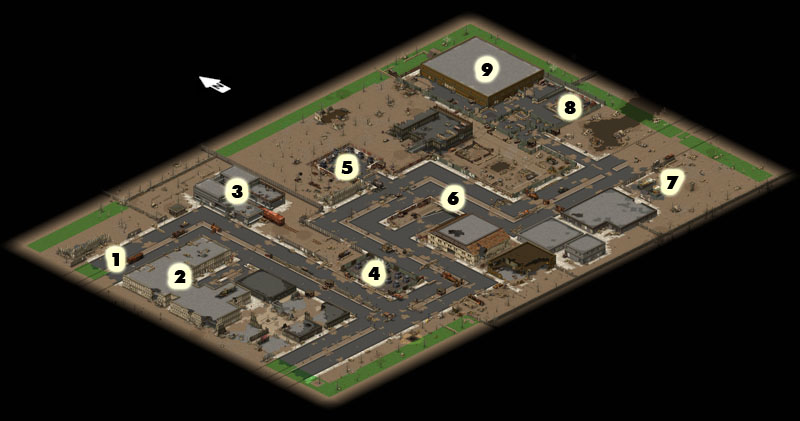
1. Start
2. Informant
3. Still Building
4. Rear Bunker
5. Raider Encampment - Leader in middle tent on the North side.
6. Prison - location of Ripley.
1. Freeport has a ditch surrounding it. You can either choose to go over the bridge, or you can walk through the ditch directly (which is only possible in certain places). Either way, be careful of enemies. Once you are on the other side of the ditch, go to the southeast. You should encounter the informant in a building here. Talk to him to find out more information.
2. Now, proceed northeast. You should come to an encampment with a fire in the middle. The building on the southwest side of the opening contains Ripley, a prisoner. In the same building as Ripley is an alarm. To make your job a little easier, keep the raiders from setting off the alarm. If the alarm is set off, everyone will know you are there.
3. One of the raiders that are near the building that Ripley is in will be carrying a key. This key is needed later, so be sure to take it. This key does not open the door to Ripley's cell, though. Don't worry, though; you'll get the key for that soon enough.
4. The village elder of Brahmin Wood can be found in the building to the west of Ripley's. Go talk to him, and he will tell you to come back and see him when it is safe to leave.
5. Go south now. Keep in mind there are other alarms that can be set off, so be quick about killing enemies. However, be prepared for a strong throng of raiders to be attacking you. In fact, the raider leader of Freeport can be found in one of the tents here (there are two tents to the west; the second one to the north has the leader). The leader has the key to Ripley's cell, so once you acquire the key go free Ripley.
6. Check out the area now to be sure that you have eliminated all of the raiders. Then, follow the street north. You will come to the ruins of two trucks that was being used as a barricade. Now proceed west until you see a building to the north. Use the key you got from one of the raiders (see #3) to unlock the door. Next, kill the raider inside the building.
7. Go southwest and eliminate the rest of the raiders now. Once this is done, return to the village elder and inform him it is safe to leave. You should then have completed the mission.
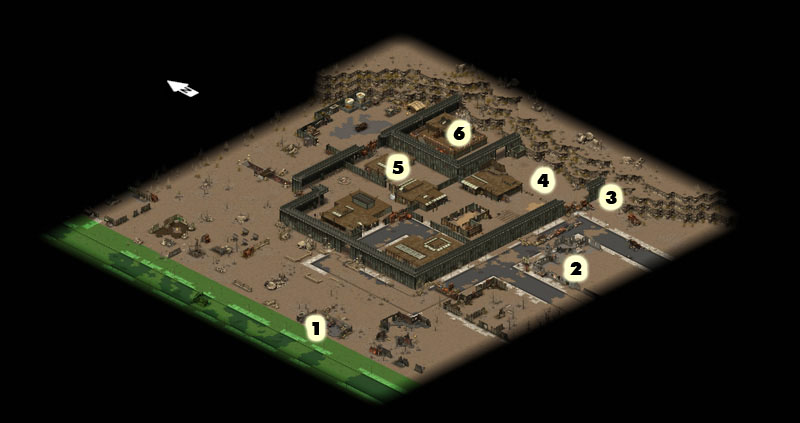
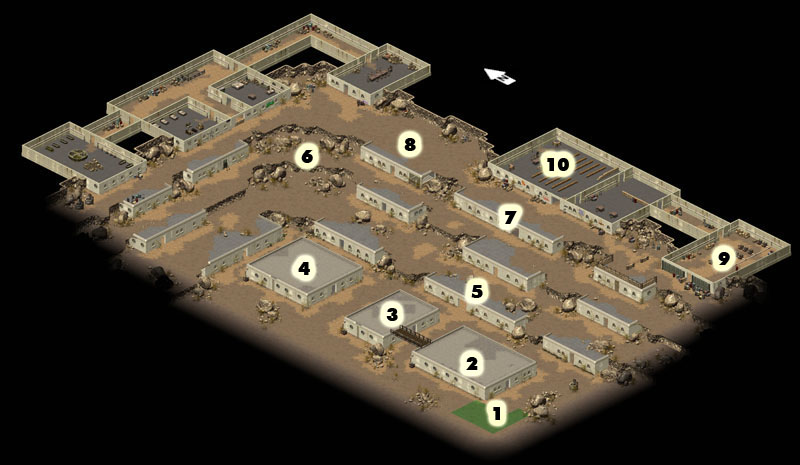
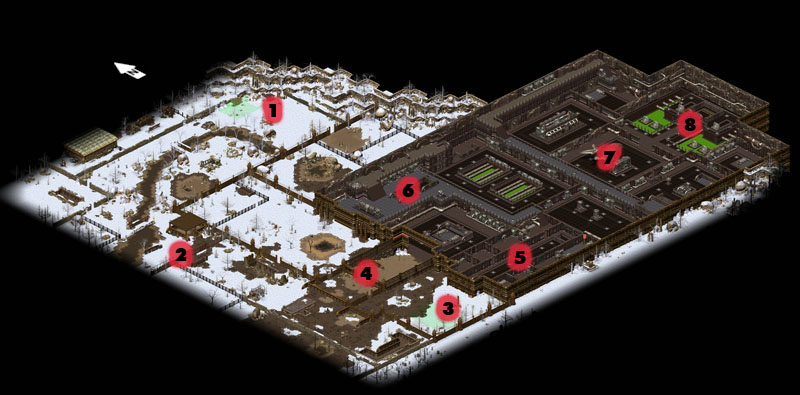
1. Start / Exit
2. Ruined building used as perimeter defense.
3. Secret rear entrance.
4. Mined area.
5. Prison with Diesoon.
6. Leader compound.
1. Go West of where you start off. Here are a group of raiders behind some rocks and stuff. Kill them and go on your way. (They were put there to ambush the scribe dude you rescue later.)
2. Head east of where you are and pick off all the raiders you see because in this mission you have to kill them all. Most of the raiders to the west have only berettas so it's easy pickins.
3. Now head north and kill every raider there. There are two raiders inside of the building and a sniper on the second level of the building. Proceed north and then go south when you can get behind the car barricade. At the very bottom of the wall of cars is a raider hiding and a crate. Kill the raider and then go back the way you came.
4. Head west to the entrance and be careful. The gates are heavily guarded with two huge raiders with ak47s. (In your Character menu if you go to kills, raiders are classed as raiders, raiders-large, and raiders-huge) There are also five normal raiders, four armed with scorpios (smgs) and one with a beretta.
5. Once inside, kill the one or two patrols in the parking lot/street. Then go into the eastern tent/building thing. In the northwestern corner is a large raider so be careful and kill him before he lets off a shot. Loot the bookcase for some medical supplies and the chest has some Ringpulls. Then go down the hall and crouch down because there are some guys in there behind barricades. When you are sighted a forced speech window will appear with Daisy the raider and she will tell about how she should keep some of your squad as personal slaves. After that kill them all and get the key from Daisy's corpse. Unlock the door and the tribal will talk to you about how Daisy abused him and now he has an STD. If you shoot him by accident it doesnt matter; you're not missing anything.
6. Go across the street to the other building and kill everyone in it. One of them says something like it's time to kill or something but that's it. Proceed outside the other door and go to the building with a door facing south (not the one thats guarded by big raiders). Kill all the men inside there and you should find a key.
7. Kill the guards outside the building (north of the building you were in) and kill the dog also. Open the door with the key and DO NOT KILL THE GUY INSIDE! The guy's name is Diesoon and he will tell you how he was captured and he offers a deal. If you get him out of the camp then he will give you the artifact you're after.
8. Go outside and head west to the door in the large wall to the outside area. It's locked and it is sometimes a bitch to get open. So, if you can't open it, you're going to have to go outside the main entrance gate. Head west from there and when you pass the edge of the big walls head north.
9. You will come across a trench and a bridge. In the trench are 2 men so kill them and proceed north. If you see any raiders kill them. I believe there are a total of three more. When you`ve killed everyone, go to the tent that's north of the trench and is in the car lot. Inside is a chest with some shotgun shells.
10. Go back to the main gate in the front of the raider base and go north to the area you haven't been to yet. Go east to the building with all the blood in it and inside is Bo the raider. KILL HIM AS QUICK AS YOU CAN! If you don`t kill him on your first volley run away and wait for him to pitch a grenade and shoot him again.
11. Go outside the way you came and proceed north. Go into the gate and don't worry; there are no raiders in the room with the brahmin. You're supposed to find out for yourself by chasing the cows outside the opposite door but there are MINES out there. (SAVE) I`d do it anyway because sometimes the cows step on a mine right beside the raider patrolling outside and blow him to bits.
12. Kill the raider outside and WATCH OUT FOR MINES. Pick the little hut's lock and open the gates.
13. Go up the stairs and watch out for raiders hiding behind barricades. Kill everyone on the top level and go downstairs. Here, kill the raider boss and his lackeys.
14. Get Diesoon and leave. PROTECT DIESOON and go to the green zone.
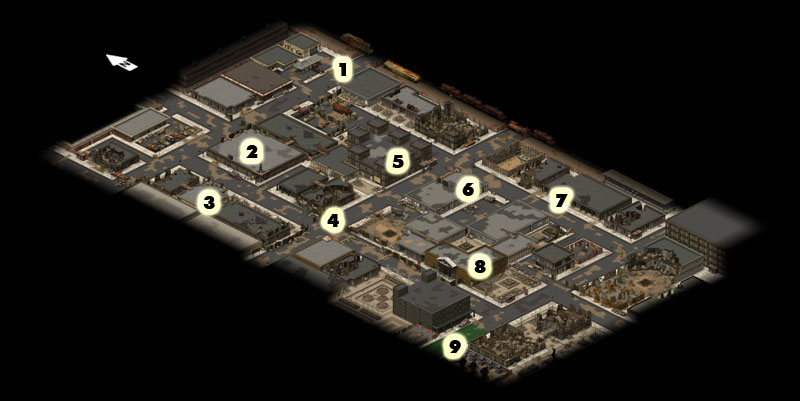
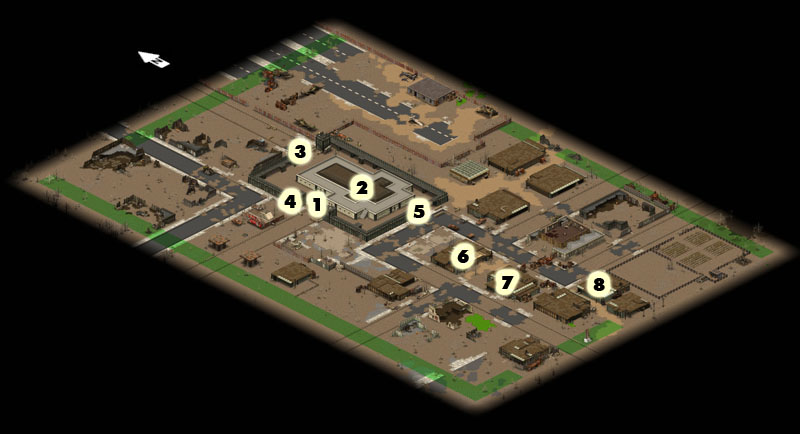
1. Entry
2. Bowling Alley with First Gate
3.Location of Gate Key
4. Second Gate
5. Corthouse
6. Find librarian glasses here.
7. Grenadiers
8. Library
9. Exit
1. When you arrive, you will receive a briefing from the last survivor of the previous escort. He will tell you that the keys are still in the vehicle, which is a Hummer. You may not want to take the vehicle right away, though. Instead, you might want to just go back for it at the end. If you don't want to do that, then I would suggest only driving ahead after an area has been cleared of enemies. Remember, if the vehicle is destroyed, you will fail the mission.
2. Go southwest now. Be prepared to recieve fire from the rooftops of buildings. This is to be expected throughout the entire mission.
3. You will come to a fence gate. There are many of these throughout the mission. The switch for the gate is on the building north of it. Use the switch to open the gate.
4. Past the gate, you'll find a pack of dogs standing over a dead civilian. Kill them and then follow the road that leads southeast to the next gate. Outside of this gate, to the left, you will find a raider that will tell you where the gate key is. The key is on the roof of the building behind him. Kill the raider now and go to the roof to retrieve the key, which is in a chest to the far northeast corner of the roofs.
5. Use the key to unlock the door for the next switch. The small shack where you can find the switch is located in front of the next gate. Once the gate is opened, proceed with caution; there is a raider ahead that has a rocket launcher. However, he only has one rocket, though. It is still enough to kill one of your guys or really damage your vehicle, so make sure you kill this man fast.
6. The next gate is to the northeast, just past the last one. The switch is to the right of the barricade where the raider with the rocket launcher was. Before proceeding, though, head southeast. Follow the sidewalk once you get to the barricade that blocks the entire road. You will eventually come to the Municipal Library. Talk to the librarian there to find out that he lost his glasses. Now, go back to the next gate and proceed with the mission.
7. Follow the road northeast to the next gate. The switch for this gate is on second floor of the building that is on the north side of the street just before the gate. All enemies in this building are on the first floor. After you eliminate them, flip the switch and proceed.
8. Once past the gate, follow the road southeast. Be careful for the minefield here, though. If you have someone good with traps, you can disarm the mines. Otherwise, you can take your chances driving past them, though this is hard to do without at least setting off one or two. This will not destroy your Hummer, providing it is still in fairly good health.
9. Once past the mine field, continue to follow the road. Expect more resistance from raiders here than you faced earlier. Just past the mine field, you'll find a building on the left side of the road. It's the one that has green, glowing goo in the back room. Enter the second door to the building and search the chest here. You'll then find the glasses for the librarian. Beware of the raiders in this building, though. Return the glasses to the librarian in order to complete that quest. In return, you will recieve a book about traps.
10. When you get to the end of the road, go southwest. This leads to the next gate. The switch for that gate is on the other side of it, so you need to go through the remains of the building to the south in order to get to it.
11. Continue southwest to the exit. Eliminate barricades by attacking them. Also, there is a man on the roof of the last building, the one to the north of the exit, that has a rocket launcher, so be careful. After all enemies are eliminated, proceed to exit grid to complete the mission.
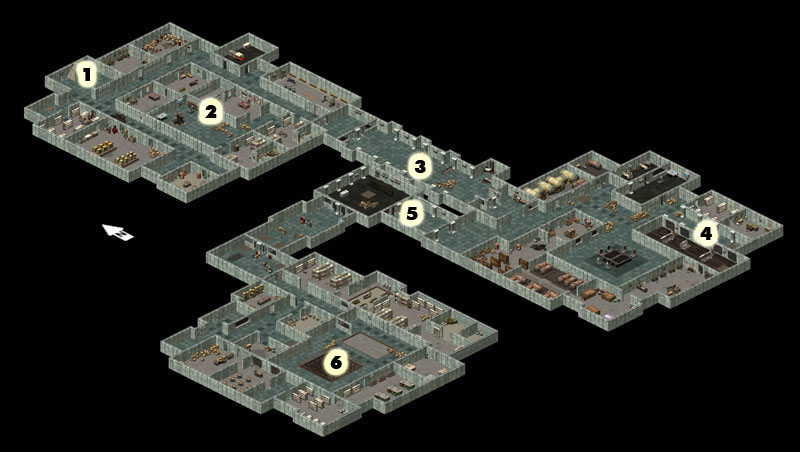
Underground only is shown:
1. Entry Stairway
2. Locked room with Powercell
3. Turret guarded entrance.
4. Turret guarded hallway.
5. Second entrance with special control panel.
6. Roacher den.
1. When you first enter this city, you should notice a ladder to the north. Go past the ladder and talk to the village elder. He'll tell you about the bad spirits that guard the fusion batteries you need.
2. Continue past the first building in the city. Then, turn right. Here you will find Dhal the Shaman. Feel free to talk to him a couple of times in order to find out more about what you are up against.
3. Go to the northwest part of town. Here you will find a staircase leading underground and another ladder. If you want, take the ladder up to the plateau. You will find some radscorpions there to kill for easy experience. Then, go down the stairs.
4. Proceed to the far southwest corner when you first get underground. You will have to go through some different rooms in order to get there because the floor of the hall is broken. In the room furthest to the southwest you will find a yellow pass key on the bookshelf. Take it.
5. Follow the main hall now. It was the one you first saw when you went down the stairs. It will lead to the northeast at first, and then to the southeast. Search all the rooms along the way and eliminate any enemies. You'll eventually come to a set of two doors that are motion activated. Before these doors, go left. You will enter a series of rooms. Go north now until you reach the room with a yellow safe-like door. Use the yelow pass key on the door to unlock it. You will find the first fusion battery in one of the lockers in this room.
6. Go back to the automatic doors. Past the doors is a switch that you must flip in order to proceed. Do so, and walk ahead. You will receive a warning about the intruder termination sequence. I would suggest saving here. At the end of the hall are two turrets. You can either take them out, which is almost impossible, or run past them. To run past them, have your guys crawl behind the barricade that is closest to the turrets. Now, wait for the exact moment that the turrets go down. then, get up and run to the end. You must be quick. Also, to better your chances, only have one person on your team run at a time.
7. This is optional. After the turrets, take the hall leading northeast. Be careful; there are more turrets around. Just use the barricades for cover and run while they are down. By the first turret, turn southeast. You want to get to the room on your right. Once there, search the fridge and lockers to obtain a pass key. Now, proceed to the room in the southeast corner of the floor. Use the blue pass key you just acquired to open the door. In the room, you can find a set of armor and a weapon. It should be worth the trip, but isn't needed to complete the mission.
8. Go back now to where the first two turrets were. South of the room behind the turrets is another room. The door is facing towards the turrets. Go to this room. This will lead you first to another room, and then to a hall with machinery on both sides. In this hall there is a locker that contains the second fusion battery.
9. Continue to follow the hall. At the end, continue through the rooms. You will come to a room with two doors, one on the northwest wall and the other on the northeast one. Use the one on the northeast. In that room, flip the switch. Be careful of the turret, though.
10. Go back to the first two turrets again. This time, follow the hall southwest and then northwest. You will come to a room with a switch. This switch opens the doors to the next two rooms and disables the internal turrets. That means all underground turrets will stop functioning. On the down side, it also activates all external turrets after ten seconds. That means that the turrets outside will attack the people of Preoria. If you want to complete the mission and save the town, which would be recommended, you will have to leave a person behind here. You may want to save before attempting this. First, flip the switch. You then have ten seconds to get your troops through the next three rooms. You must be fast. After your guys are through the rooms, flip the switch again. You may have to take cover and flip the switch early in order to save the entire town. Flip the switch again then to reset the ten seconds. You will have to use the same approach when leaving this area. Also, make sure you flip the switch when the turrets are down. If you choose not to save the town, then you don't have to worry about that; just flip the switch once to disable the internal turrets now, and flip it again when you leave so you don't have to deal with the external ones later.
11. Once past the three rooms with turrets, proceed southwest. You will find another turret, but you can just run past this one while it is down. Keep following the series of rooms until you reach a room that has two lockers, some beds, and a shelf. The door in this room leads to the middle of the floor. The shelf in the room also has a trap on it.
12. Go through to the large middle area and take out all enemies. In this room you will find the Roacher, which is basically a huge roach. You shouldn't have much trouble defeating him, but you may wish to save beforehand to be safe. The last fusion battery is in this room.
13. Exit the underground now, using the same tactics as you used before to get past the turrets. Then, talk to the elder. He will give you an extra fusion battery. Finally, leave the mission.
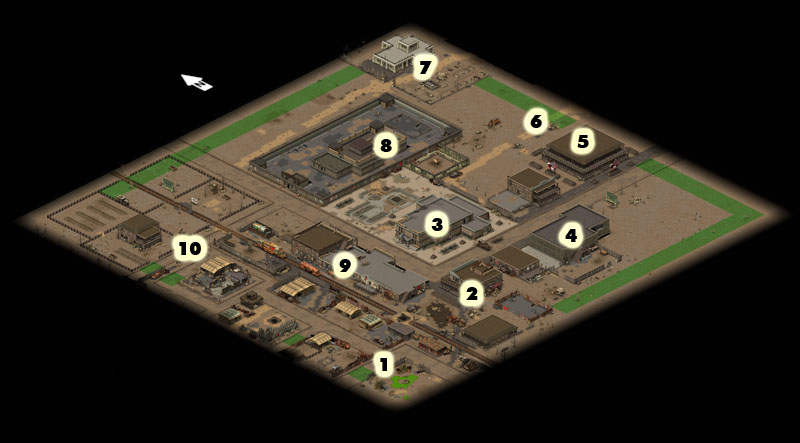
1. Entry
2. Building where mayor is held on the 2nd floor.
3. City Hall
4. Building where hostages are held.
5. Whorehouse.
6. Hidden underground entrance.
7. Chapel under control of deathclaws.
8. Prison
9. Train station.
10. Ghoul Quarter.
1. When you arrive here, head southeast. You'll come across the mayor's secretary Arlene. Talk to her to find out that the mayor is being held in the large house. Your first task is to free the mayor without allowing the beastlords to set off the alarm.
2. Go past Arlene. You'll come to a building after the railroad tracks. Go through the building. Once past it, you will come to a basketball court. The building directly northwest of the court is where the mayor is located. You can save her in one of two ways. The first is to simply run in and kill all hostiles before they can set off the alarm. The second is to go directly to the floor where the mayor is. To do this, go up the ladder on the side of the building that is facing the basketball court. Sneaking isn't required, but it may be helpful. Once you are on the roof, go southwest to the next ladder. Take it down. In the first room you'll come across here is the commander. Take him out before he can set off the alarm. If you decided to eliminate all hostiles on the first floor before attacking the commander, the same applies. Just kill him before he can set off the alarm.
3. On the corpse of the commander is a key. Take it and use it to unlock the door where the mayor is in (it's the only other room on the second floor). Talk to the mayor to receive the siren key and find out about other hostage situations.
4. Go back to the roof. Use the key that you just received from the mayor to unlock the door where the siren is. Then, go in and flip the switch to disable the siren. Then, go back to the first floor. If he hadn't already done so, eliminate all hostiles there.
5. Go directly northeast. You will come across two buildings. The first one is abandoned. The second has a staircase on the outside on the southeast side. Go up the stairs and look around the building. The second floor has no enemies. The first floor is where some civilians are being held hostage and is also where the power generators are. Eliminate the beastlords here and keep as many civilians alive as possible. Also, don't let the generators be destroyed. The commander on the first floor has the detonator for the plastic explosives that are by the power generators. Eliminate her before she can use it.
6. Leave the building and proceed northeast. You'll come to a sign for Quincy with the population listed. To the northwest of the sign is a building where some prostitutes are being held. If you want, free them.
7. Go back to the building where the mayor was. Then, go to the City Hall building just northwest of that. In this building is Evita, the mayor's daughter. Eliminate all hostiles in the building and free her.
8. In the back room of the building where Evita was being held is a ladder going underground. Take the ladder and follow the underground level until you get to the next ladder (it's the only ladder there). Go up the ladder. You'll then be in the building where Felix, a warrior of the town, is being held. Eliminate all of the enemies on the first floor. Make sure that the alarm is not set off. If it is, the beastlords will attack and kill Felix. After the first level is clear, go up the stairs, which are next to the ladder that you used to get to the building. On the second floor, you'll find a bunch of enemies and Felix. Eliminate all of the beastlords before they can kill Felix. Then, talk to him to receive thanks.
9. Go back to the first floor and leave through the door to the southwest. Continue directly southwest. You'll come across another building. Go through this building to get out of the prison encampment. You will notice a road with train tracks going over it. There will also be a fence to the southeast. Follow the road until you reach the ghoul quarters sign. To the northwest of the sign, past the fence, is a building with beastlords in it. They have been fighting with the ghouls, and have even taken a hostage. Eliminate the beastlords there if you want. If you do, make sure that Gorgi, the hostage, stays alive. After he is freed, talk to Elliot, his brother, located in the ghoul quarters. In payment of your good deed, he'll say that the ghouls will join the brotherhood.
10. If you want, search the rest of the town and eliminate the rest of the beastlords. Then, leave the mission.
1. Entry / Exit
2. Church
3. Tavern
4. Quickiemart
5. Planet Donut.
6. Hotel
7. Box Factory
8. Town Park
9. Town Hall
10. Prison
11. Flea Market
1. When you first arrive here, talk to the town guard Carino. He'll be the first person that you see. He'll inform you that the mayor has already been captured.
2. Follow the street to the north and you will come to a barricade in front of an open gate. Past that, you will find some enemies. Eliminate them. In front of the first building to the right after the gate is a buggy. If you want, take it.
3. Continue north. You will encounter some heavier resistance a little further ahead. Once again, take them out. Your best bet is to do this at a distance with snipers. After that, go past the barricade that stretches across the entire road. Go to the second floor of the building to the left of here. You must go around the building to the west in order to get to this floor. Eliminate all of the enemies here and search everything to receive some experience.
4. Go down the stairs of the building now and proceed directly north. You will come across some more enemies. Kill them again. Now, go to the second building to the north of the one you were just in. Stay behind the buildings. The one you are looking for has a ladder that leads directly to the roof. Take it and kill the raiders there. Then, climb the ladders on the roof that lead to the rest of the building and search it. You will get more experience from this.
5. Exit the building the same way you entered it. Once on the ground, go around the south side of the building to the street. Go to the gate directly across the street. Past the gate is a bunch of hostiles. Open the gate and eliminate all of the enemies. Continue south and kill all hostiles as you go.
6. Proceed all the way south now. You'll go past an opening in the fence to the right. Don't worry about this hole because there are only townsfolk there. Instead, just continue south. You will eventually come to another opening in the fence. Here, turn northeast. You'll come to a bunch of burning tires. Then, proceed northwest. Eliminate all of the enemies.
7. Eventually, you'll come to a gate. The last two buildings of enemies are past this gate, so you may want to save before going on. The mayor is in the building furthest northwest. After the enemies have been eliminated, talk to the mayor to recieve thanks. If you want, you can now follow him and listen to his speech. Then, leave the mission.
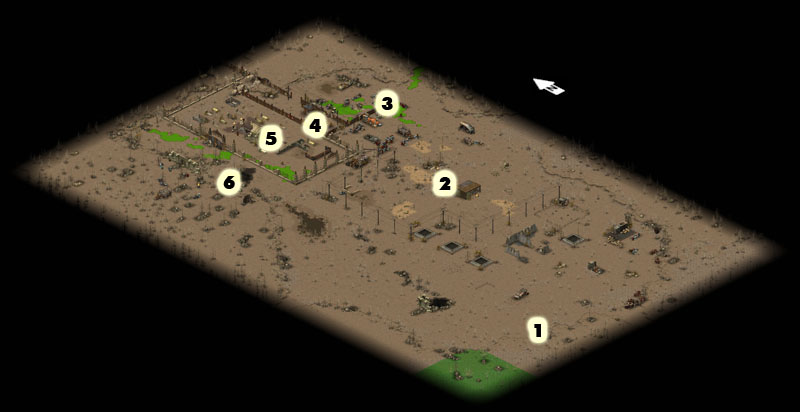
Surface only is shown:
1. Entry / Exit
2. Beastlord Forward Camp
3. Radiated Swamp
4. Underground Entrance
5. Mardin Cemetary
6. Caverns Entrance
1. When you first arrive here, proceed north. You will eventually come to a cemetery. In the cemetery, you will find two sets of stairs. Go down the first set you encounter.
2. Proceed to the northeast now. You will come to another set of stairs. Go down to find a small room with yet another flight of stairs. Go down this one as well. You'll then come to a hall with prison cells on each side. After the cells are some stairs to another room. You may want to save here. In the next room is the Deathclaw Matriarch. She is being held in a prison. Eliminate the beastlords in this room. One of them is carrying a key. Use the key to unlock the Matriarch's cell door. Talk to her then and she'll side with you against the beastlord leader. Follow her and help her eliminate the enemies. Make sure the Matriarch doesn't die.
3. Talk to the Matriarch after the battle is over. She'll tell you that she'll talk to your leaders later. Now, leave the mission.
1. Proceed towards the cemetary, but this time do not enter it. Instead, go to the west of the cemetary. Go down the set of stone stairs here. Examine the crypt below and kill all hostile creatures that come after you.
2. Towards the south, you will find a ladder. Take it down, but beware of the two little deathclaws that await you there. After you have killed them, take the next ladder further to the southeast up. You will come to a switch. Do not flip it! Kill the two beastlords that are in the hall. Keep away from the cells, though, so the deathclaws there don't attack you.
3. In the next room after the hall is the Deathclaw Matriarch. Follow the directions above to free her and then kill the beastlord leader. Then, leave the mission.
1. Start / Exit
2. APC location
3. Supermutant guard houses - also mined
4. Remnants of Fang Squad
5. Minefield
6. Trenches
7. Mined ramp.
8. Supermutant base.
1. You start this mission in a building with an APC. If you want you can take the APC right away. Otherwise, you may come back for it later. It really doesn't make a difference. Also, just a warning, but there are several super mutants in this town armed with rocket launchers, so you may want to save often.
2. To your left you will find some super mutants. Eliminate them right away. Otherwise, you'll have to deal with them at the end of the mission.
3. To the east of the building where you started is a bridge. Proceed over it, taking out all mutants you encounter. Pay close attention to the ground now. You should notice a set of darker tracks in the dirt. Follow them, they will take you east and then turn north. Following them will take you to the last known location of Fang Squad. You will find out that they have been killed. If you want, search them for supplies.
4. You can go in one of two directions now:
A: Continue to follow the darker tracks in the ground. They will lead all the way north and
then run to the northeast, over a bridge. Past this bridge are two super mutants, both
armed with rocket launchers. Eliminate them, and then turn south until you come to the
trenches.
B: After finding the remains of Fang Squad, turn west. Almost directly west you will come
to another bridge. Across it is a mine field. If you have somebody good with traps on your
squad, you can disable all of the mines. Otherwise, you'll have to shoot them or try to get
across without killing your squad. Go northwest until you are past the minefield.
5. Go northwest now. You will come to a small dugout. In there is a mutant with a rocket launcher. Kill him and then search the dugout. You will find a chest there that has two doctor's bags in it. Take them; you'll need them later.
6. Proceed northeast now. You'll find a broken down vehicle and the survivors of Talon Squad here. Have your medic use the doctor's bags to heal the members of the squad. Then, take the APC over there so they can board. Then, take the APC to the extraction point. Don't leave the mission yet, though.
7. South of the building where the doctor's bags were are the trenches. Follow them. You can either go through them or along them; it doesn't matter. Just be careful not to get yourself killed. The trenches will run south before turning west. Continue to follow them until you come to a bridge that goes over the green goo. This is the entrance to the mutant base. You can try to take it out if you want, but it isn't required. In the trench right before the bridge is a man who saw General Barnaky get captured. However, he has explosives strapped to him. You can disarm them and try to get as much information from him as you can. However, he will still die in the end regardless.
8. Leave the mission.
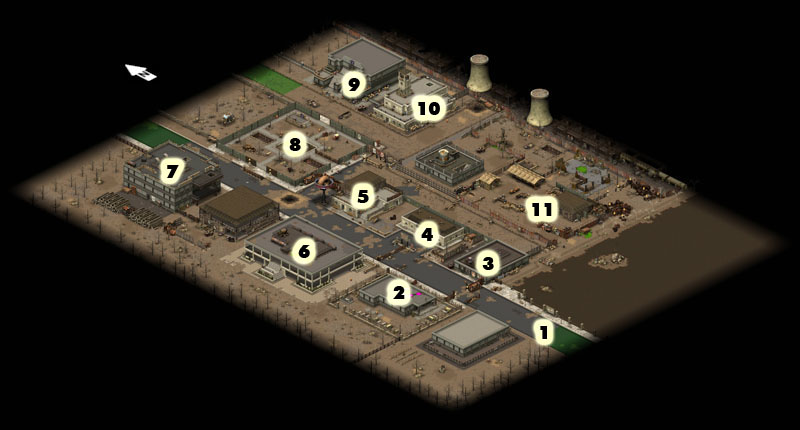
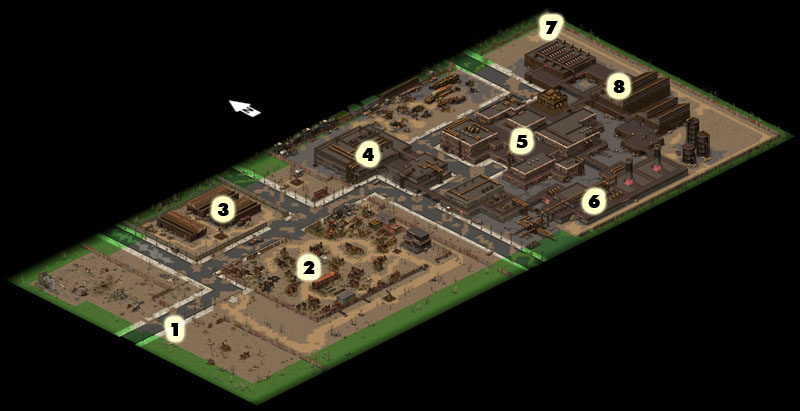
1. Start, Scout Car location
2. Office building controlled by Supermutants.
3. Railway Station.
4. Power Generator 1
5. Power Generator 2
6. Underpass
7. Passage to radiated underground
8. Power Generator 3
9. Supermutant research factory
1. First off, there is a scout vehicle located near your squad when you first arrive. You may use it if you want, but I never found any real need for it. Also, most of the mutants are hostile here. However, after you enter the main building of operations, you will encounter a few who will not attack you. I'd recommend leaving these ones alone.
2. Notice the building immediately to your left when you start the mission. On the roof of this building are a couple of super mutants (one has grenades; the other a rocket launcher). Make your way along the west side of the building. You will come to a hole in the wall that is protected by some traps. If you have someone who is good with traps on your squad, then you can disable them. Otherwise, continue onward. You will come to an indent in the building; this is actually an overhang. Go under the overhang. To your left you will find an opening in the wall. This one shouldn't be guarded by any traps. After you are in the building, proceed to the roof and eliminate the super mutants there. There is one other super mutant on the second floor, though, so be careful.
3. Exit the building and go back to where you started the mission. This time, follow the road to the east. You will come to a turn to the south after a short distance. Don't change directions, though. In front of you is a building with a bunch of super mutants in it. Eliminate them.
4. Go back to the road and follow it to the south. Kill all super mutants you encounter. You will come to a barricade that starts on the north side of the road and stretches half-way across it. The next structure on the north side of the road past this is where the first generator is located. You can shoot it to destroy it.
5. After the generator is destroyed, make your way around the west side of the structure. You will come to an opening in the fence followed by another road. If you want, you can go around the building the other way but you will face some resistance.
6. Follow the road you are now on to the north, sticking close to the fence. The road and the fence will both turn to the east after a while; continue following it. After a short distance, the fence will turn away from the road; once again, continue along it. You will notice some piles of debris here. When you come to the last pile, which consists of a few crates and some tires under a tree, turn east. You may receive incoming fire from a nearby turret to the east. If you do, you can either dodge it or destroy it. It doesn't matter.
7. You'll come to another fenced-in area. Inside here is the second power generator. Destroy it.
8. Proceed through the exit on the east side of the fence. While passing through, you may receive fire from another turret. Again, ignore it or destroy it.
9. Continue north until you come to another tall fence. You'll pass by another building on your way to it. Once you reach it, follow it southeast. You'll encounter some hostiles along the way; just kill them. You'll eventually come to an entrance in the fence; this is the way into the base. Proceed now to the northwest, eliminating all super mutants you find. You'll go through a brief and simple maze of barricades and such along the way. Eventually, you will come to a building. This is the headquarters. As soon as you reach it, turn northeast. You'll come to a structure protected by a large gate. To the right of this is a smaller, fenced-in area. Here you can find the third generator. Destroy it.
10. Upon destroying the third generator, the gate you just went past will open. Go through it now to meet the commander. She'll say a few things and then attack you. Kill her and then enter the base through the door that was to her left when you found her. Here you will find a mutant scientist. Don't kill him; rather just speak with him to find out about his research. Next, proceed to the second floor of the building. Here is the last power generator. Destroy it and exit the mission.
1. For starters, follow the same instructions above to destroy the first two generators (Steps 1-7).
2. Proceed back to the road using the same method you used to get to the second generator. Continue following the road this time. If you receive fire from the turret by the primary entrance to the second generator, you can destroy it or leave it. It's up to you.
3. After a few turns in the road, you will come to a barricade. Destroy it and continue onward. You'll go past one more building on your right then before you come to a fenced-in area. In this area is the underground entrance to the base. It is guarded by only one mutant. Kill him and then proceed down the rocky steps. This passage does require you to crawl in goo. You may become radiated as a result. Therefore, you might want to save, take some rad-away, or both. It's up to you.
4. After you have made your way through the tunnels, you will come to an open room. In the northeast there is another, smaller room with a set of stairs in it. Take them up to the headquarters. You will then find yourself in a room with a super mutant. However, this one should not attack you, so just leave it alone.
5. The door on the north side of the room is open. Proceed out it and move along the south side of the building. Kill all hostiles and continue to move along the building. You'll come to a structure protected by a large gate after a while. To the right of this is a smaller, fenced-in area. Here you can find the third generator. Destroy it.
6. Upon destroying the third generator, the gate you just went past will open. Go through it now to meet the commander. She'll say a few things and then attack you. Kill her and then enter the base through the door that was to her left when you found her. Here you will find a mutant scientist. Don't kill him; rather just speak with him to find out about his research. Next, proceed to the second floor of the building. Here is the last power generator. Destroy it and exit the mission.
1. Start
2. Church
3. North Gate
4. West Gate
5. South Gate
6. First Commander
7. Second Commander
8. Third Commander
1. When you first arrive in Kansas City, you'll find yourself by the west gate. Along with this one, there are two other gates you must defend as well. The north gate will be the least heaviest attacked; hence it will require the least number of reinforcements. I'd recommend just sending one good squad member to this gate. Divide the rest of your team up between the west and the south gates. You'll have to do this quickly, as the mutant attack begins almost immediately. If you have them and have time set mines outside of the sandbags. Also, all super mutants are hostile here and will attack you. Therefore, be sure to eliminate all of them.
2. After you have successfully defended the temple, move your squad to the west gate once again. This time proceed out of the west gate, away from the temple. You will come to two towers. Each one has a mutant on top. The mutant on the south tower has a rocket launcher. Eliminate these mutants and then proceed south, following the fence that surrounds the temple.
3. You will eventually come to a building at the end of the fence. Go around the building and proceed east, following the road. When the road turns, continue straight ahead. You will come to two buildings then, one on each side of you. In each of these buildings is a super mutant commander. Kill them and all other enemies in the buildings.
4. Go back to the road you were just on. Go south until you reach the next building. This building shouldn't have any mutants in it. Turn east. The following building you encounter will be the location of the last super mutant commander in the area. Kill him.
5. Make your way north, back to the south gate, killing all hostiles as you go. After the super mutants are all defeated, talk to the ghoul bishop. He is in the main room of the temple, right in front of the nuclear bomb. He'll give you thanks and honor the Brotherhood with the weapon. Finally, leave the mission.
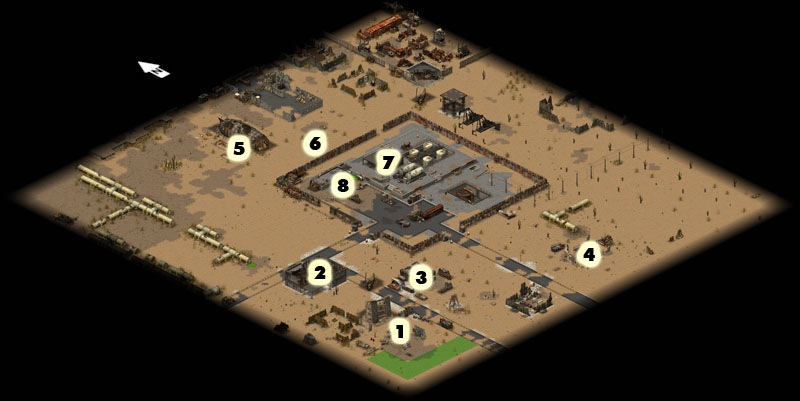
1. Entry / Exit
2. Ruined Building
3. Old Gas Station
4. Underground Entrance
5. Zeppelin
6. Minefield
7. Guard Hut
8. Underground Entrance
1. A few crates are available nearby so load up with a few T45LE mines, remote detonators, and super stimpacks. Head north to the nearest ruins. Stay hidden and don't go in the building to the north. There is a supermutant patrol that will pass by before you can get to the building. There also is a sentry in the southwest corner of the building that will pull an alarm if he sees you so use sneak once the patrol is past. Kill him and the 2 other mutants in the house. There is a crate with plenty of ammo and 3 first aid kits. You can try to kill the patrol but they are heavily armed, one with a 50cal Browning M2 and 2 with M249's. Head north staying hidden behind the pipes on the west. Go and visit Roshambo the idiot at the crashed zeppelin. He doesn't say much worth listening to but there are some nearby crates with 8 stimpacks.
2. Head along the area well north of the fence in the ruins. Go to the junkyard and kill the 2 supermutants there - one is armed with an M249 SAW. In the far northeastern corner is a crate with some ammo and items. To the south is a tower with 2 mutants armed with M249 SAWs. Cover them with snipers and sneak a heavy weapons guy or two up there. It is an important place to snipe from if you can get it. Go slowly west along the fence. A character with high perception should be able to spot the traps if you give him time. Sneak in the back entrance up the stairs and behind the sand bags. It's a good idea to crawl here. On the other side of the sandbags is a supermutant. Pop up and kill him. There is another mutant to the south and one in the tank pit to the east. Kill them and you control the back of the guard hut. Use it as cover to kill the others in the front. Be careful of the many fuel tanks which can explode if hit. They can be used to your advantage but don't hide near them. Inside the hut are 2 more armed with SAWs. Check the bookcase for 50cal ammo and stale donuts.
3. Once you have the inner compound mostly cleared head downstairs by way of the stairs at the northwestern corner of the compound. Follow the corridor to the east and go into the next room. You will find a bookcase with some 50cal ammo and super stimpacks. Go 2 more rooms to the east and throw a grenade from afar at the 2 supermutants in there. The gas tanks will take care of what the grenade didn't. Go to the room to the south where you meet a wounded supermutant named Toccomatta. He tells you about the robots that took away their prisoner - General Barnaky. He is out of it and thinks you are Gammorin. After he talks he will jump up and die. On his body you will find Barnaky's holodisk which is important to keep for the very last mission! There are some shelves near his body that contain a few first aid kits.
4. Go into the room to the east carefully to take out the 4 supermutants. Two are behind the bar and one hiding behind the door. Now beyond the automatic door to the north is Gammorin. This door opens when you are nearby so use caution! Gammorin has 2 supermutants with him. Find the briefcase in the chest at the bottom of the bed and then head back upstairs.
5. Another way to get in the compound is by way of the secret underground entrance to the south but you will have to go through a radiated tunnel and the place where you resurface will be dangerous. Another location to note is the old gas station outside the southwest corner of the compound. There is one supermutant there and a bookshelf containing ammo and mutie serum which increases your endurance but makes you stupid.
1. Entry / Exit
2. Martha's Home
3. Casey's Home
4. Angry Rick's Tavern
5. Town Hall
6. Juan's Emporium
7. Farm House
8. North Gate
9. Secret Underground Opening
1. This is the only mission where you will fight the Reavers. It is very interesting and well planned.
2. Your mission is to retrieve some robot parts for BOS scientists to study and also to get the mechanic Casey to join. Fighting will come a little later. What? You don't want to wait? You want to fight now? Well......ok. Set your mode to aggressive and head west. Stop by the home of Martha Dilbert where her husband Hank was just gunned down by Reavers who stole a robot part from him. Four of the reavers are still outside but the robot part is already gone. There is a plasma rifle in her house and a FN FAL in the bookcase. Now you can head back to the main entrance of Junction City and head in. You will first meet Chuck who says he will sell you a robot part. If you have money to spare you might want to buy it but it's a fake. Walk west and visit Casey Barrett to try and convince her to join the BOS. Her father was wounded in a reaver attack so she can't leave yet. Heal her father with a stimpack and then she will meet you back at the bunker.
3. Stop in at The Pit - Angry Rick's Tavern and see if he wants to part with his robot part. He says no but you might be able to gamble it from him. Or keep talking to him long enough and he'll get scared and just give it to you. You can also go upstairs and loot a Science book from the bookcase. In the building to the southeast, take the ladder up to the second floor and you'll find a mystery brahmin in a room. Now go over to talk to Juan and he will sell you a robot arm. The building west of Juan's is empty but you can find a few things on the bookshelves. Go up to the second floor and there is an addition in the southeast corner with a hard to reach ladder going to a cellar cavern. You'll first encounter a Giant rat then you'll find a crate with a paramedic's bag and field medic kit. Follow the cavern west for encounters with 6 more Giant Rats until you reach a cell door. The room behind it holds several tables with stuff, 3 chests, and a small shelf with a Neostad shotgun, explosives, 2- M1 Garands and various other useful stuff. Be careful of the first chest which is boobytrapped. Head north to find another small room with 3 Giant Rats and 3 chests and 2 crates filled with rifles, ammo, mines, and grenades. Take the nearby ladder up to the surface where you will be in the far northwest corner of the map.
4. You may want to head east to the north gate and lay down some of these mines you have found. Talk to the mayor and he will offer you the robot head in exchange for killing the Reavers. Then go to the next room and talk to the mayor's assistant. She will tell you who else has tobot parts but we've been there already! Go upstairs and you'll find a bookcase with papers, and some poison antidote. Soon after you have the robot parts a squad of Reavers will attack the north gate. Be there to prevent them from killing the mayor or getting in too far.
5. Once the attackers are dealt with make your way to the farm house by following the main road. There are many hidden reavers and mines buried right where you want to take cover so be extra careful. To take the farm house I recommend crawling along the far north half wall. Pop up every once in awhile to take out nearby reavers. A frontal assault will be tricky because of the 4 reaver snipers on the upper porch. There is a buried mine that needs to be removed at the only opening of the half wall. Then make a dash for the north side of the farm house. You should be able to kill everyone on the first floor by shooting in the windows on the north and east sides. Sneak around the back of the barn and kill the squad hiding in there. Kill the remaining reavers in the front of the house then go in the front door. The interior door is locked and boobytrapped. Open it and find the robot torso on the workbench. Now go upstairs and take the first door on the right. You'll see a dead civiian on the bed and one soon to be dead reaver in the corner. Go out the door you entered and then around the corner to kill 2 reavers then go out on the porch and kill whoever remains. Go back and talk to the mayor for the last robot piece.
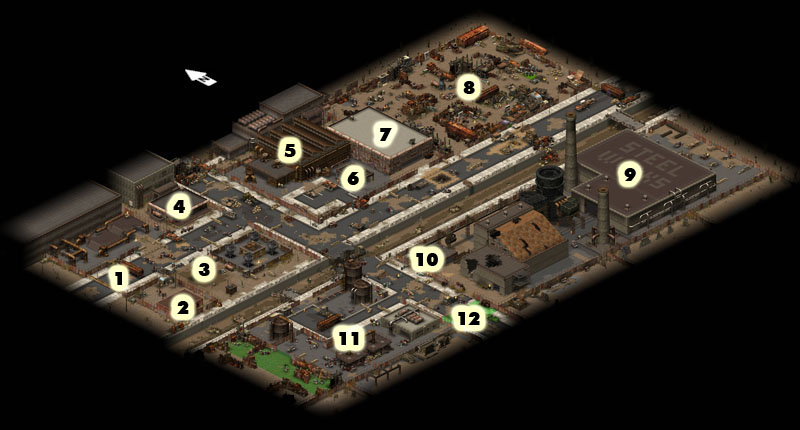
1. Start
2. Noelene's Home
3. Downed Wires
4. Switch House
5. Warehouse
6. Mike's Shack
7. Factory
8. Junkyard
9. Steel Works
10. Trapped Robot
11. Crushing Press
12. Exit
1. Now is the time to do battle with the robots. Talk to Jake hiding behind a car to find out what is going on then turn the corner and kill the 3 humanoid robots nearby. To the left is an opening in a fence - head back there and you'll find a couple bodies. The woman has a few stimpacks. Go to the top of of the structure to kill the bot below. Head back down opposite where the electric lines are down and you'll find the body of Ripley. She has several books that might come in handy. Move south while avoiding the electrified ground and unlock the gate leading to Noelene's home. Talk to her to find about the trapped robot and also to loot her bookcase of all sorts of medical goods. Head back to the northeast to the building where a gate switch is located. You can also find a small shelf with some bottled acid. The first gate then opens revealing a couple of humanoid bots taking potshots at you from east of the fence. Kill them and walk to the northeast to a small door in the wire fence.
2. There is a warehouse back here with 2 load lifters and 2 security bots inside. Get the load lifters to chase you and then ambush them. Go in to finish off the other bots. Loot the bodies of the 4 dead civilians here for some shotgun shells, stimpacks, a few books and some 9mm ammo. The crate downstairs has 2 T45LE mines and a few frag grenades. The locker upstairs has 2 plasma grenades and some beer :P From the upstairs window you can kill a few humanoid bots over in the junkyard. South of the warehouse is a small hut with a locked door. You can pick the lock and get in from here or take the underground passage from the drainage ditch splitting Great Bend. Inside you will find Mike who hates the BOS. Loot some acid, psycho and a science book from the nearby chest and leave.
3. To the east is a factory building with a large opening facing south. Approach with caution - inside are 3 security bots and there are 2 humanoid bots in the street to the south, one armed with a vindicator. Once they are dealt with go inside. Only one dead civilian body is worth looting far inside armed with a Browning Auto Rifle and 27rds of 30.06 ammo. Go upstairs to the small office and unlock the door. In a small shelf you will find 2 super stimpacks and some mutie. There also is a dead civvie with a CAWS shotgun, 30 flechette shells, 9mm AP, and 4 stimpacks.
4. Head east to the next north gate and blow away the barricades closing it off. Go north into the junkyard and do battle with the scattered humanoid bots. They are well hidden around most turns so use caution. There is some booty to be found in the northeast corner. A fridge on the northern fence has 2 super stimpacks. A dead civvie in the middle has 4 stimpacks and some 9mm AP and another dead civ on the east end near the exit gate has a field medic kit and a classic nuka cola. A crate nearby has "food" like a stinky meat platter and pre-war donuts.
5. Leave the junkyard out of the eastern gate then take a little side-tour to the west along the fence. Laying in a bed is the hooker Gloria who promises she can, "suck start a tank". Talk to ther for awhile or barter for some basic useless stuff. Go back to the east and across the bridge. There is a dead raider with a plasma rifle and some 7.62 ammo. You can either enter the steel yards through the door to the south or head west. Heading west and to the destroyed bridge you will have to fight 3 humanoid bots; one armed with an M60. Follow the road to the south and you'll find a supermutant with 30 rds of 50cal. There is a gate back to the steel yards here but you can't get in. So go back the other way....
6. The door to the yard is unlocked so go in and deal with the 4 humanoid bots. They hide behind cover so you can use the exploding fuel tank to your advantage at least for the far one with the sniper rifle. Go along the south side of the foundry and come out by the smoke stack. There you will deal with 1 humanoid bot and 2 load lifters. Snipe the 3 load lifters in the foundry to the east then go to the north wall where you will find 2 lockers. The west one contains a suit of environmental armor II and the east locker contains 2 paramedics bags, a trauma pack and an ultra stimpack. Next to the lockers you will find a dead civ with a cattle prod. Another dead body lays farther east with a super tool kit and a wrench. Now head west to the building with the trapped pacification bot and kill him. Flip the outside switch to open the gate to the road and then continue west.
7. Destroy the barricades blocking the gate to the next area and take on the remaining load lifter and humanoid bot. If you are feeling creative you can try to crush the load lifter by running through the machine and flipping the switch on the other side. It needs to be timed just right though. There is a body of a dead civ in the yard that contains some mentats and mutie. Leave by the exit grid.
1. Start / Exit - Auditor zone
2. Barracks
3. Shop
4. Tavern
5. Market - Tier 1
6. Casino - Tier 2
7. Ma Baker - Tier 3
8. Minefield - Tier 4
9. Power Room - Tier 4
10. Guldo HQ - Tier 4
1. Talk to the Auditor General to get a short speech and then head out to search for the lost power armor. You can stop in the Shop or tavern in the inner courtyard to barter or head into the cliffs. The market might offer some useful stuff to but bypass it if you are well stocked with stimpacks. Stop in the chapel to the north of the market but don't bother talking to Father Donald. Crawl under the opening in the altar into the hidden area to the east and check out the freezer. It contains an M249 SAW, a Flamer, Metal Armor Mk II, and some ammo. Go to the stairwell to the north for your first combat with 2 raiders behind sandbags, one armed with a Neostad combat shotgun and the other with an M16 and a sniper rifle. Loot their corpses! Keep going north to watch the cockroach races or to gamble with Don Vinchenzo. Otherwise there isn't anything left to see on the first tier so go upstairs.
2. You'll find a dead civilian in the doorway to the north warning you of the 3 raiders laying in wait beyond. Loot their bodies and stop in at the casino to the north for a little gambling fun. Head out the casino to the west and you'll walk into an ambush from 2 warriors, one armed with an M16 and the other with a sniper rifle. Keep going west and the first room on the right you'll find a warrior with an M60 guarding 2 BOS crates. One crate has a nice Browning M2 and a sniper rifle, the other 300 rds of 50 cal and 10 frag grenades. Turn the corner to the south and enter a locked room with a bookshelf containg another 100 rds of 50 cal and a trauma pack. Go back to the stairway and go to the bar in the room south of that. You'll meet Simon Dudley asking for help in rescuing his sister. Follow him south to a closed metal door and go in to kill an unarmed warrior guarding Adele Dudley. Follow them back to the bar and talk with Simon and he will give you some ammo as a reward. If you go to the next room south there will be a far doorway blocked off with sandbags with a guard on the other side. Snipe him and then go to the doorway and you might be able to kill of the other 2 warriors in the front of the room armed with grenades. If not enter the room from the front and kill them. There is a crate in the back with an Avenger minigun, pump shotgun , and some ammo. Head back to the stairs and go up to Tier 3.
4. Go south and you can barter with Ma Baker for a power fist. Keep going south and you'll find a trio of bad guys, one armed with a M249 SAW and hidden guy around the corner with grenades. Then go back to the stairwell and this time head north. Go into a main hallway and you'll fight three warriors. Best to kill them with snipers. There is nothing to see in any of the side rooms so go around the corner and carefully approach the next stairwell by staying along the north wall. There are 3 raiders behind sand bags and are heavily armed with M60s and a rocket launcher. There is not much else to find on this floor except in the very last room to the west where you can find some acid and incendiary grenades in a cabinet.
5. Head up the set of stairs and hide in the corner. In the hall to the east there is a patrolling warrior. When he turns around send a man to shoot him and then run back to cover. The warrior will chase you and you should have an ambush set up for him. He will have the first piece of BOS armor. Keep a couple heavy weapons guys laying in wait behind the corner and send a few others to the next hallway going south to the west. In the far south doorway there will be a warrior behind sandbags that can be taken out. You might get a few warriors charging down the hallway from the east to be hit by your ambush. Send a man down the hall to the west and in the last room you will find a footlocker with a some medical items.
6. Walk up the hallway to the east and around the bend to the south into a hopefully empty room. As you exit to the outside cliff there will be a sniper on the roof above. There are a few crates with mines nearby and a dead soldier. From there to the south is a minefield so tread carefully. Once you approach the building with the 666 painted on the wall you will catch fire from inside. You cannot enter the doors here so keep going. Farther ahead to the south are 2 warriors with heavy weapons behind sand bags. Snipe them and keep moving. Past them should be no more mines. You come to an entrance into a generator room. Use your snipers to get the guys hidden far inside. There are 3 warrios there, one is heavily armed and has another piece of BOS armor. Flip the switch to turn off the power and lights.
7. Take the corridor to the north. At the end is a guy with an M60 that needs to be killed by snipers. enter the next room from the left side and take out the 2 warriors behind sandbags. Sneak to the left most door and slam the guy waiting around the corner wth a rocket launcher before he can fire. If you did the work properly from the windows outside everyone else should be dead. Find the corpse of Guldo for the remaining piece of BOS armor. Meet the Auditor General and give him the armor.
1. Entry / Exit
2. Foundry
3. Robot Factory
4. Reaver Camp
5. Nuka Cola Plant
6. Reaver Headquarters
7. Reaver rescue.
8. Junkyard
1. This mission is where the BOS finally allies with the Reavers to battle the robots. But first you need to rescue the four reaver envoys. There also is a tank here that may come in handy but it needs to be repaired first. Make your way into the foundry in the opening where the body of the reaver is found. Inside are 2 humanoid bots which need to be taken out. The one bot has some 50 cal ammo and a toolkit for repairing the tank. Go upstairs and in a smaller room there is a workbench with 7.62 ammo, a paramedics bag and some dynamite. Outside you will find a humanoid robot on the right and 2 scurry bots on the left.
2. Take the bridge across to the next building west. Go through the door and take a left. There is a scurry bot to kill. In the door you will find a safe with a doctor's bag and a small energy cell. Open the door in the next room into the corridor where you will find a humanoid bot waiting for ou at each end of the hall. Kill the west one first - he has the vindicator. Don't go in the next door - it is boobytrapped. Go back the way you came and when you enter the room you will find a breathless Glenda Close. She will join your squad and you should take her to area where you started for her to wait. If you want to use her to fight in your squad save the game then load the saved game to change her to use Sentry Mode Aggressive.
3. Head out the east side of the foundry and you will find an opening in the corrugated fence. On the south side of that fence are 3 hover bots so show yourself, then run to draw them into an ambush. Walk to the west along the street until the first drieway leading south to the Nuka Cola factory. As you approach the main office, 5 scurry bots will come out of hiding to die. The reavers on the nearby rooftop will help you kill them. Go to the ground floor of the office and you will meet Rodger Gaire, another reaver elder who will temprarily join your squad. Send him with a single scout back to the entrance area. There are some goods upstairs in a second floor chest including a flamer, fuel, trauma pack, and 50 cal ammo.
4. Walk east to the Reaver camp south of the office is a fence. Follow it to the west and at the far corner you'll see a humanoid bot with a vindicator laying prone in ambush. Because he is looking the opposite way you can hammer him relatively easily. Keep sneaking west along the edge of the map until you get past the start of the building then cross over along the face of the building. Move back to the east slowly and you'll see another humanoid bot trying the same trick. Kill him the same way. There is a pot here with several varieties of stimpacks and some unique acid grenades. This area should be secure now go northeast to the opening in the corrugated fence. Sneak through the opening and there will be a kneeling bot behind sandbags looking the opposite way again just waiting for you to put a bullet in its CPU. Nearby along the fence is a crate with 100rds of 50 cal and some canisters of acid. Run into the yard to the north to round up and kill 3 scurry bots.
5. Now go back the way you came from the south and head towards the building again. There is a set of double doors you can enter. You can take a quick climb upstairs but there isn't much there. A small shelf in the room with the flag contains some rockets, 50 cal ammo, and a super stimpack. A door on the south end by the stairs leads outside where you'll find a dead reaver with a super stimpack and some 5.56 ammo. Go downstairs to the main floor and then to the basement. You will see 2 guards next to a workbench with a super toolkit. In the first room on the right you will meet the reaver elder, Tobias Peste. Talk to him and he will temporarily join your squad and give you the key to the safe where the EMP rifle is located. There is nothing else that can found here so you can leave the building and send Tobias the safe route to the entry area.
6. Walk back to the yard where you killed the 3 scurry bots and follow the street north. You will come to a 2-story building on the left with a glowing red entrance up a few stairs. Hide behind the sandbags in the street and snipe at 2 turrets inside the first room. Loot the 250 rds of 50cal ammo from each turret and head upstairs. At the top of the stairs and to the left you should see many mines so don't go that way. Go the room on the right to meet the 4th reaver elder Albert Lamore. Let him sit there while you clear the rest of the building or you can end the mission now by heading to the exit grid.
7. To continue: go back and disarm the mines to get to a door in the southwest corner of the building. Don't bother going downstairs, there is nothing there. Head upstairs and flip the switch which deactivates the turret in the next room. You will find a chest with 3 ulse grenades guarded by a scurry bot. Get them and then steal the 50 cal ammo from the turret. Go back downstairs and leave the building. Go around the north side of the building and find the junkyard to the north. There are 2 sandbagged entrances - sneak in the entrance to the east. Go northwest and you'll see a vindicator laying on the ground behind some tires. It is guarded by a bot with another vindicator. Kill him right away and then there will be a melee fighting humanoid bot that also needs to die. Loot the bots and you will also find a pot with 4 super stimpacks, 6 acid grenades, and 300rds of 50 cal ammo. If you are hungry there is a plate of bug-on-a-shell sitting on the nearby crate.
8. Go east through the fences to the other section of junkyard. Again use sneak and stay on the northern edge of the map until you see a chest. A scurry bot will see you and attack. A humanoid bot will also start firing on you but stay hidden near the chest until you kill the scurry bot. The chest has 3 rockets, a happy pie, and 2 muties. You'll meet a few more scurry bots who want to die then head to the street on the south. until you get to the fence on the north side of the Robot Factory. Follow it west and at the northwest corner of the building you'll find 3 hoverbots and a security bot. As you approach the opening to the building a tank bot will chase you from inside.
9. There is one area left to explore after this - the Reaver camp in the southeast corner of the map. The camp is a warren of ladders and stacked shipping containers. I'll try to give an explanation of how to find things but it may be difficult to follow.
10. First go to the dead bodies of 2 unlucky reavers to find a stimpack and 3 plasma grenades. Two security bots will start firing at you from ahead so kill them with snipers. Go a little east of where the reaver bodies are then take the first doorway on the left. You'll find a pot with 4 plasma grenades. In the next room go up the ladder and then go to the next storage container to the east. In the middle of the container, just barely visible in the window is an opening and a ladder leading down. It is tricky to get there because you don't get the typical arrow cursor pointing down. Keep trying and you will be rewarded - in the fridge downstairs is a suit of Advanced Power Armor. Leave the way you came in and go outside to the building to the north. Take the exterior ladder up to the second floor and you'll find a shelf with 2 super stimpacks and some acid canisters. That's about it except for the few stimpacks you can find on the bodies of dead reavers, so head to the exit grid.
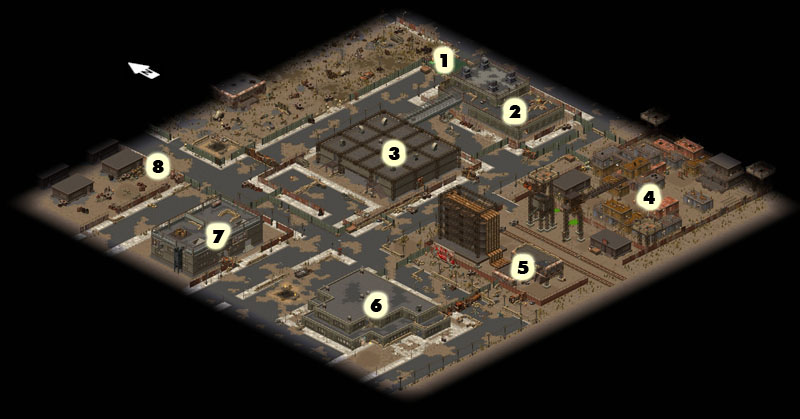
1. Entry
2. Barrel Yard
3. First Power Node
4. Lumberyard - 2nd Power Node
5. Robot Base - 3rd & 4th Power Nodes
6. Nuka Cola Factory - 5th Power Node
7. Shaft to Underground
8. Cryogenics Lab - 6th Power Node
9. Access to Underground
1. This is a tricky mission where you need to simultaneously destroy 6 power nodes with remote detonator packs. So make sure you have them otherwise you will have to find the packs somewhere on the map first.
2. You will need to take the first street on the right which is protected by 2 security bots and 4 scattered humanoid bots. First, move your heavy weapons guys into position by sneaking them along the north fenceline directly behind a sandbagged position where a single bot is armed with a sniper rifle. Bring at least two guys in by crawling in the prone position. Hopefully the rest of the squad are good snipers. Keep them in sneak mode near the opening of the street. When everyone is in position change them to sentry mode aggressive and start attacking hard. Hopefully you should finish the assault with no casualties. One middle bot is armed with an M60 and has 9 remote detonator packs. Another is armed with a Neostad comabt shotgun and 5 more packs. On a workbench near the back you will find 4 plastiques and some other goodies. On the last bot in the rear you wil find a gauss pistol, 29 rds of 2mmEC and a detonator. You are set to conquer now.
3. There is a door leading north to the Lumberyard. Open it and you will meet 4 scurry bots to kill. To the right is a small building with the first power node. Get as close as possible to the node and place a detonator pack in your active slot. Click it once and set the frequency to 1 - it will automatically be placed then. Go north past the giant rip saw and along the north wall you will find a ladder leading down in a small hole. You will also be attacked by 2 scurry bots. Go down into an underground passageway. Continue north and go up the other ladder to find yourself in the courtyard of the fortified Robot Base. Stay near the building and snipe the turret to the south. There are a few mines in the open path between the barrels. Move around the back of the building to get to the other side. Take out the other turret. Go back to the side of the building and try to unlock the door going upstairs.
4. Go upstairs and to the north until you reach an opening. Take a few steps in and you'll see 4 "ball things" on the north wall. Hidden between each one is a security bot so it's just a matter of hammering each one separately. The next room south has 2 humanoid bots in the center barricades armed with a Vindicator and a Plasma Rifle. "Talk" to the terminal on the east wall for a recording made about the when the Calculator took control. Enter the center room to the south to find another terminal playing back some more history. The other room to the south has a Power Node guarded by 3 scurry bots. Read the terminal here to complete a mission objective. Plant an detonator pack near the node.
5. There is another stairway leading to the roof but it is empty and is useful only to snipe any remaining bots in the yard below. Head down to the 1st level. Go to the next room north then to the hallway where you will find a tank bot to destroy. Across the hallway is a room with a power node guarded by 3 security bots. Plant another detonator. Go south to the next room on the left. Behind a half wall is a humanoid bot armed with a Sunbeam Gattling Laser and 2 scurry bots. There is a last locked door to the south concealing a pacification bot.
6. Leave the Robot Base to the south and go the street. Head west to the locked door. Open carefully there are 3 hover bots to the northwest. In the building across the road to the west you will find another Power Node on the second floor gallery. If you want some action head south to find 4 humanoid bots in sandbagged positions and in a trench. Otherwise go north to the Nuka Cola Factory for a tour. Go in the large open door near the truck and you'll take on 2 security bots hiding among the bottles. Then go to the back room where there is another Power Node. Leave the building by the door to the west. A little sidetrip can be found through the fence to the northwest where there are 3 humanoid bots hiding in trenches. A chest can be found here with lots of ammo and super stimpacks. Bypass them by staying between the fence and the building and then going a little east until you find a gate. Cross into a little storage area. In the southeast corner of this area you find a ladder down to the underground passageway. Not much of interest there except for a wandering tank bot.
7. Go to the exit in the fence in the southwest corner of the storage area. Around the corner to the south is a trench with 2 humanoid bots armed with plasma rifles. One last little sidetrip is going northwest from here to a dead end street with a sanbagged position guarded by a humanoid bot and 2 hover bots. It is a boring battle....
8. Follow the road south until you come to an opening in a fenced area to the east. Go in towards the ruined building. You will find a door leading south into the building proper. Don't go in here. Go all the way east to the fence and sneak around the building to the south. There is a switch here to shut off a pair of nasty turrets. Now go in the main entrance to the west, unlock the big door, go in and plant your detonator pack, then kill the 2 scurry bots. Put the detonator in an active slot and click it once. It will display the 1 frequency that all the packs should be set to. Click ok and destroy all of the nodes. Nothing much else to do except kill any remaining bots and go to the exit grid.
1. Entry / Exit
2. First Gate
3. Yard with Behemoth
4. Grail squad location.
5. Entry corridor.
6. Emergency alarm activated by bot.
7. Shuttle bay.
8. Reactor location.
1. Welcome to the winter wonderland of Buena Vista - I hope you brought your thermal armor! This is no social club so be prepared for some heavy fighting...
2. Head due south to an opening in the security wall and take on 2 humanoid bots. Loot the plastique and 7.62 ammo then go to the west. Across the stream you will encounter a couple of scurry bots, Kill them and go near the open grave where you will kill 3 more. Go northwest until you find a lone humanoid bot sitting happily in a cold trench. Make him unhappy and loot his dead body of some flamer ammo. Run south until you see a small bunker with 4 humanoid bots. Use sniper cover then run in and quickly destroy them. Beware of the nearby scurry bot. Go through the door in the fence and take cover behind the fence barricade. Hammer the 2 scurry bots and snipe the 2 bots in the trench to the southeast. They are armed with plasma grenades. Move ahead slowly to the south and you will see an underground bunker with 2 humanoid robots. There are 2 scurry bots that come from the east before you get there.Behind them in a trench are 2 humanoid bots with sniper rifles. Run them down quickly and kill the 2 nearby scurry bots. Flip the switch in their trench to open the electric gate to the east leading to the behemoth yard. Go look at the behemoth behind the electric enclosure and 4 scurry bots will attack to be quickly killed. If you head to the north opening, a sensor will open the behemoth enclosure and you will have to deal with him - be ready!
3. Once the behemoth is destroyed the electric door to the north will open and you can go in the main gate entry area. Bypass this for now and keep going north. There is a wide open yard here with a robot tank wandering around. Kill it and go to the little pen where there are 3 scurry bots. There also is a chest here that has some nice goodies including 3 super stimpacks, 7.62 ammo and 40 rounds of 12 gauge EMP.
4. Go back to the main gate entry area and use your Science skill on the terminal to open the gate in front of the building. You will see the remains of Paladin Lancelot and his Grail squad. Don't loot their bodies yet. Outfit your squad with long range weapons and slowly move down the slope in a spread formation. At the bottom of the slope in the building there is a turret armed with rockets.
5. After it is dead you will have to move in to the hornet's nest. Inside the opening there are a total of 7 security bots scattered about. Two pair are hidden on each side of the opening, invisible until you are near the doorway. Their crossfire is deadly. Another is in the center near the power node and two more are guarding the rear. I'd advise concentrating the squad to one side and fight a few at a time. Do not go inside or take a head-on approach until the front five bots are dead! Once all the bots are finished, destroy the power node. Now feel free to go back and loot the bodies of some nice miniguns, ammo, and a few ultra stimpacks. The bots have some fusion cells, and the turret has some rockets.
6. There will be one security bot to destroy in the entry hall inside the complex. In the first room on the left you will find Initiate Percy barely hanging onto life. He dies after a last gasp and you can loot him of an M60 and some ammo, also some flamer fuel. There is nothing in the other room. Heading into the corridor you will find a load lifter and two easy security bots. Kill the load lifter from inside the room and the two bots will go down easy. Don't bother looting these bots.
7. Cross the corridor, the first room is empty as is the room on the right. The larger room on the left appears empty until you run towards the terminal. Two scurry bots will attack and also a well-armed humanoid bot behind the half-wall. Take them to bot heaven and then use the terminal to open the door into the rest of the complex. Loot the humanoid bot for some goodies before you go.
8. Go though the newly opened door at the end of the hall and get ready for some big action. The best way to do this is to run up the stairs and take your squad all the way to the back. There is a lone humanoid robot that when he sees you will try to hit a security alarm which opens a barrier letting out 7 security bots. If you kill him before he can reach the alarm it will be easier. He also has a nice Vindicator with plenty of ammo. Then sit up on the landing and kill the load lifters down below. Go up the back stairs and at the top you can take on the seven trapped security bots. There is a now a long corridor that you have to go down to reach ladders leading downstairs. Be careful - at the end of the corridor is a pop- up robotic turret. He fires 2 rockets at a shot and then pops down for a few seconds. Stay out of range then when he is down, send a heavy weapons guy or two around the corner from him. When he pops up to shoot at your out of range squad, wait until he fired 2 rockets then pop around the corner to shoot. Repeat until he is finished and then loot his rockets.
9. Take your squad down the ladder then go up the ladder to the next catwalk. Snipe the humanoid robots in the next bay near the robotic flyer. There should be three humanoid bots and a few more pop-up turrets. Distance is your ally. Finish them off then head down into the bay. You will have to deal with four scurry bots and then just head from room to room making sure it is clear. In the room to the far northwest there is another power node to destroy. When you get near the robotic flyer activate the console which will destroy it and open up a sliding door to the power plant. Be careful, there are four load lifters, two humanoid bots and three hover bots. After they are done, destroy the two turbines and the power plant is shut down. Mission objective complete! Find and destroy any remaining bots and the last power node in the remaing room. After the third power node is down then you can head to the exit grid and back to Bunker Epsilon.
1. Entry / Exit
2. Junkyard
3. Internment Camp
4. Factory Building
5. Main Building - Kerr on roof
6. Power Plant.
7. Behemoth zone
8. East Factory Building
1. Your squad enters on the west end of Scott City and should quickly move into position on the southwest field behind the fence. You can send a man to a ruined building in the northwest corner to get some plastique and an ultra stimpack in a locked safe. Beware the single scurry bot in the area. If you have mines lay them around the first intersection to do damage to the patrolling robots who often pass the nearest intersection. There is a behemoth and a few humanoid bots that can be a nasty introduction to robot warfare.
2. Move carefully into the junkyard on the west side. A pack of hover bots will attack from the south so spread out and hit them hard before they hit you. There are plenty of scurry bots in the junkyard and also a few humanoid bots. Send a runner to flush out the scurry bots and get them to follow him to a predetermined ambush location. Don't take on too many at a time unless your squad is deadly. Snipers are the best way to handle this map but are well supplemented with a few heavy gunners to guard their fronts. Close combat against behemoths and also hover bot packs is difficult.
3. Clear the junkyard and destroy the jamming tower there and also the one to the south. Clear the streets to the north of the behemoth and humanoid bots. Now you want to head over to the internment camp. There are several humanoid bots scattered around the outside of the buildings. Try to position your squad to fight one or two at a time. Avoid drawing fire from bots inside the buildings until you have the exterior cleared. Work the perimeter of the buildings first; east side, north side, then west side. Then clear the buildings and free the three prisoners. Each building has a single sentry bot. Destroy the jamming tower in the yard.
4. Leave the Internment Camp and take the road to the east. Just past the first intersection on the northeast corner is another jamming tower. Be careful, it is guarded by 3 humanoid bots and 5 hover bots. Use the corner of the camp fence as cover and equip everyone with burst fire weapons. After they are defeated destroy the tower. One humanoid bot will be hiding behind the trailer, rush him and hit him hard.
5. Follow the road east until you approach a factory building. A rooftop sentry bot will start shooting - take him out with snipers. Also beware a scurry bot from the south. Climb the stairs to the second floor catwalk and enter the first door on the left. Equip your snipers and start shooting from the gallery onto the bots down below. There should be 4 load lifters and 2 humanoid bots. Move along the gallery walk until you come to the stairs going down. There are two crates with some plasma grenades and explosive rockets and don't forget to loot the humanoid bots. The lifters don't carry anything. In the southeast corner of the room is an entry to the building to the south. There is one humanoid bot beyond the entry. Go into the next room to the south. There is no more booty in the building so go upstairs along the catwalk. In the street to the south are two gun turrets. Expose your squad to one at a time. Further to the east at the entrance to main facility is a behemoth with 3 hover bots. Once you cross the catwalk bridge over the street they may see you. You may also catch some fire from the research building to the south from 2 sentry bots in the second floor. You may want to snipe them before crossing the street and then take out the behemoth on the east. There also is another behemoth to the south on the street. So this is a pretty bad area. Stay on the catwalks and use your snipers.
6. Go across the catwalk to the 2nd floor of the research building and go in the room. Take the inside stairs down to a lab and through broken windows to the east you will see a machinery room on a lower level. There are two sentry bots in there and a hover bot hiding behind one of the vats. The room is also full of explosive barrels. You can throw a grenade in there to kill everything but there is a footlocker with some nice booty that will get destroyed if you do. Otherwise you will have to fight the hover bot from inside the room. Take the south door to an entryway and then the east door will lead downstairs. Before you go down there go to the next room to the south. Open the door to the room to the east and kill the humanoid bot. There is a locker with a heavy minigun and some ammo and you might be able to kill the hover bot in the lower room from this side. Find your way to the lower room and you'll notice behind the vat on the east wall is an open vent. Crawl in and you'll find a small room with a footlocker. Inside you'll find a grenade launcher and some ammo.
7. Get back up to the roof catwalks and head south then east, taking out any sentry bots snipers along the way. Cross the bridge to the roof of the power plant. Leave the alarm switch alone and enter the doorway of the rooftop room. Kill the hover bot and sentry bot but you may not want to take the stairs down. There are 4 humanoid bots near the bottom of the stairs and 5 more that are nearby. Try it but be ready to run back upstairs if needed. There are 2 lockers on the main floor with plenty of goodies like a rocket launcher, sniper rifle, an enviro armor suit and plenty of ammo and stimpacks. Out the back door near the southwest corner of the plant you will find 4 scurry bots. Go along the south side of the power plant until you get near the 3 storage towers. There are plenty of enemies scattered about here including 7 scurry bots, 5 humanoid bots, 3 hover bots, and a behemoth. Needless to say - be careful! Try to take on a few at a time.
8. Walk along the east side of the map until you come to the back door of the East Factory Building. In the first large room you will fight one sentry bot and 6 hover bots. Try to fight them from the doorway. There are 3 dead bodies on the floor - one has a paramedic bag and some rad-x. Go inside and continue north. In the next large room you will encounter 6 more hover bots and 2 humanoid bots. Check the lockers for another grenade launcher, grenades, and several mines which will come in handy. Go upstairs to the catwalk and you should be able to start sniping the behemoth in the behemoth zone outside. There are also 9 scurry bots which might make an appearance in the same area. Exit the door to the roof catwalk. Somewhere you may encounter a humanoid bot patrolling the walk. Travel south until you get to the bridge linking to the Main Building to the west.
9. Entering the building you will find a behemoth on patrol. Kill it and head downstairs. You will be under fire from the east by a sentry bot hidden behind a fence. There is only one other sentry bot on the north side hidden under the stairs. There is a power switch in the middle of the floor that you should enable. Near the last sentry bot you killed is a doorway leading to a stairwell. Open it and go upstairs. There will be another sentry bot in the room upstairs. He is guarding a crate with some ammo and a paramedic bag. Continue upstairs to a rooftop control room. Exit the door and be prepared for a hover bot to the west as well as one straight ahead. Kill them and open the back door of an elevated room in the center of the roof. Be careful, there are 5 humanoid bots including one well armed with a Gauss Minigun. Hit him hard and fast so you can loot his stock of 2mmEC ammo. From that room you should be able to attack the 2 turrets and humanoid bot to the east. They guard the room where Kerr is held. You can kill Kerr but you will lose reputation and get a bad debrief. The bot guarding the room has a poison chem you can use on Kerr. Loot the locker for some stuff then head south to the last rooftop room. There you will find the remains of Barnaky minus his head. Mop up the remaining bots on the map, including a room on the second floor with 2 sentry bots guarding a couple lockers with a minigun and ammo. There is one building in the junkyard that has a few things in a bookcase on the second floor.
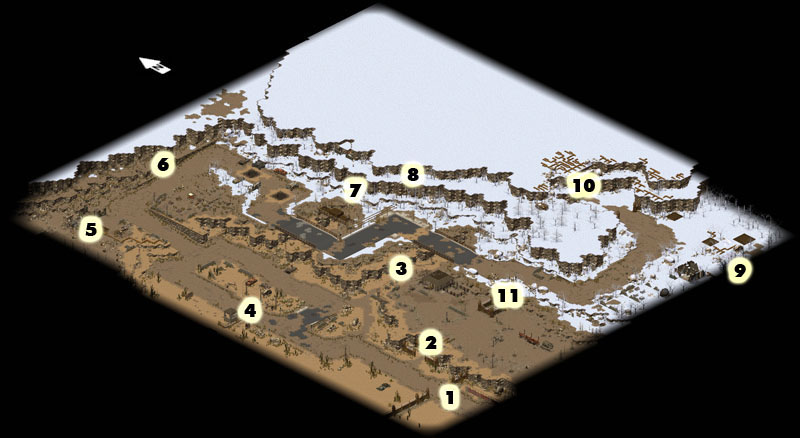
1. Entry
2. Blast Proof Bunker
3. Canyon
4. Minefield
5. Power Generator #1
6. Turret Bunker
7.Ladder to Cliff
8. Power Generator #2
9. Power Generator #3
10. Vault Entrance
11. Rear Bunker Entrance
1. This will be the beginning of the final assault. There is no going back to the bunker from here so take everything you will need with you.
2. Your squad starts with the nearby APC Nuke. I would leave it there until later - if anything happens to it you are screwed. Go north and near the abandoned car on the left there are 2 scurry bots. You also might be seen by 2 humanoid bots up ahead who will come to try and give you an enema. Stop into the small bunker on the right. It might look empty but there are 2 sentry bots on either side of the inside of the door. Be ready with heavy weapons and rush in past them. Then turn the full firepower of your squad to bear on them. You can click on the 3 terminals to get some background history,
3. Exit the bunker and go to the north. Stay on the right hand road because of the mines on the left road. You will have to deal with some heavy resistance especially with snipers on the cliff top. Proceed carefully. Enter the first canyon on the right and go to the footlocker. There is a hover bot guarding it so take him out quickly. The footlocker has a toolkit and some dynamite. Watch for snipers up top. Leave and continue north slowly. There are a few humanoid bots along here hidden behind rocks. Enter a second canyon on the right and you'll find a crate with 100rds of 2mm EC and also 50rds of 50cal. Keep going north until you are at the bottom of the ramp. There is a 3rd canyon with a crate guarded by 2 scurry bots. The crate is boobytrapped with a claymore and has a few much needed stimpacks.You may have noticed the turret on the left side of the ramp which needs to be removed.
4. Now might be a good time to heal and reload. Arm yourself with long range weapons and head up the ramp on the left side. There will be a power generator up on the left side guarded by a pacification bot. Rush past him and take cover in the ruins back in the corner. It is a good spot to atack him. Destroy the generator and move up the next ramp again staying on the left side. There are several humanoid bots by the turret bunker ahead of you. Take them out first, then take on the 3 turrets one at a time.
5. Follow the road and start going south. You'll meet some more humanoid bots hiding behind the ruined vehicles. Go up the ladder on the side of the cliff to kill the humanoid bot in a small alcove. Follow the cliff south to destroy the generator. Then go back down the way you came. Head south along the road until you come to a bridge guarded by 2 humanoid bots behind destroyable barricades. There also is a unique bridge east of it with a turret on top. Cross the first bridge and move on to the next bridge. Be careful of hover bots up on the cliff above raining rockets down on you. Snipers are handy here. Don't get too close to the bridge, there are a row of mines laid down in the road. Take out the bridge guard and then disarm the mines. Move over the bridge and you will notice a nearby farmhouse. It has a hover bot inside which will start to snipe you. There also is a nearby humanoid bot in the fenced area. Running down the short ladder will meet you with 2 scurry bots, then clear the area around the farmhouse.
6. Return up top then kill the humanoid bot behind a stone wall. Approach him carefully - he is guarded by a few scurry bots. But the nearby crate has 150 rds of 2mm EC. Follow the road and you'll find a heavily fortified area with 6 security bots, 2 humanoid bots and 2 scurry bots. After they are done you may want to take a few snipers up the ladder here and head east. The cliffs are a good vantage point to take care of the behemoth and several turrets in the next valley. Kill as much as possible - there are a few hover bots and a humanoid bot guarding the vault entrance too. Then go back down to mop up the packs of 6 scurry bots and the remaining generator. Go back along the route and loot everything and mop up any remaining resisitance. Get the nuke APC and with a single driver, take it right in front of the vault door. Make sure your remaining squad is holed up in the blast proof bunker. Also make sure the driver is a fast runner! Once the nuke is in place there will be a 60 second countdown. Run straight to the back door of the blast proof bunker and be inside before it blows. You may want to save before this happens - this is a bad time for surprises!
7. Sit back and watch the nuke explode taking the poor brahmin to the pasture in the sky.
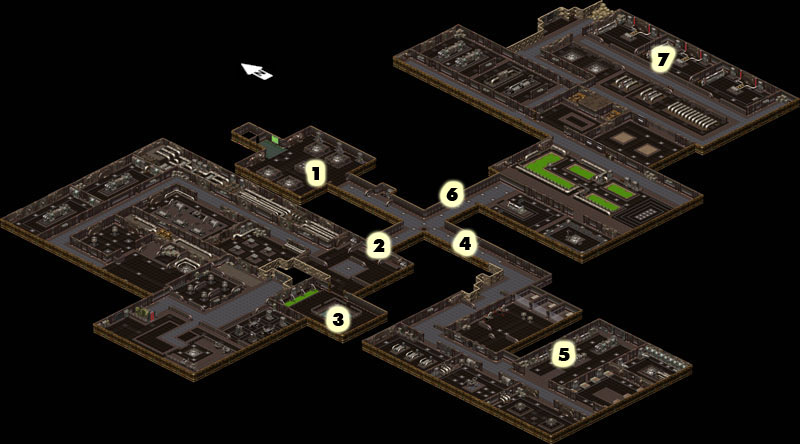
1. Start - meet Dagger Squad - 1st terminal
2. Security Section
3. Terminal to unlock Cryogenics
4. Cryogenics Section
5. Location of head to unlock Power
6. Power Section - dental scanner
7. Power Nodes
1. The first thing is to hook up with Dagger Squad in the entryway. They are arrogant, frightened bastards who don't help you much so steal everything they have (without getting caught of course!) Get ready then use science on the terminal in the middle of the room to open the door. A major robot assault waits in the outside corridor. Let Dagger Squad take the brunt of the assault and try to stay out of the crossfire. Move out and kill the remaining bots. Walk west to the Security section and open the doors. Don't go in yet, you will take some fire immediately. Stay in the corridor on the north side of the door and kill the first few bots in full view. In the first room there should be 2 humanoid bots, a security bot, and 2 hover bots. They all manage to hide behind half walls so aren't too easy. There are also many humanoid bots that will come running once someone punches the alarm console. Clear the corridor and the two rooms on the left.
2. Once you turn the corner you can see a tank bot at the end of the next corridor. Kill him and then go to the terminal halfway down the hall. Use science on it to open the doors on the north wall. Enter the two rooms to destroy 3 humanoid bots. Each room has two locked lockers holding all sorts of useful booty including 10 ultra stimpacks, 2mm EC, 12ga EMP shells, electrical rockets, and pulse grenades to name a few items. Go down the hall to the west and turn the corner until you get to a large door. Open it and rush the corner to the left and hit the 2 humanoid bots guarding the storeroom. They are well armed with vindicators and lots of ammo so take care. You can't go in the storeroom yet so go in the opposite door. Inside are lots of bots including 3 load lifters and about 10 humanoid bots. Be very careful not to kill the load lifters in front of the door otherwise they will block your entrance. In the northwest corner of the room is a switch to unlock the storeroom door and to shut off the security turrets. Use it and go load up on all sorts of treasure including a gattling laser, lots of stimpacks and ammo including the rare 50cal DU. Then you can over to the last room to use the terminal unlocking the cryogenics section.
3. Enter the Cryogenics section but be careful when turning the corner. There are 4 security bots sitting behind half-wall barricades as well as a few tenacious scurry bots nipping at your ankles. Take the corridor west where you can fight many more security bots. There are also several firing from the rooms to the west. Try to limit your exposure to too much fire or you will cook. Clear the western rooms first then mop uo the corridor. Stop and pick up the dead head and then go over and use science on the nearby terminal. The power section should now be open. Stop and talk to the confused bot but don't kill him or your reputation will be shot. Stop and load up on a few basic supplies in the 4 lockers and then stop in the final room of the cryogenics section. It really isn't worth the nasty battle with the bots and turrets in the room except for experience points. There are a few paramedic bage to be found in the locker and on a raider body.
4. Take your crew over to the first room in the Power section to do battle with 2 minigun turrets and 2 humanoid bots. Then use the terminal to open the door. Don't exit yet but fight the bots from here - there is a lot of radiation in the green areas of goop. Take some Rad-X otherwise. In the green area are 4 humanoid bots you will have to destroy. When you get to the door to the next area, Dekker will tell you to turn the power grid online. After the door is open the room to the right is guarded by 2 humanoid bots. After they have been dealt a losing hand use science on the two terminals there. Move to the end of the corridor to a door on the right. Inside are 6 scattered security bots or "53CU1217Y BOTS" :) Kill them and run south to the next door.
5. You are getting close! Follow the hallway and turn the corners until you get to the power plant area. Say hello to the pacification bot with your minigun handshake and take on the several humanoid bots hiding behind the half walls. Slowly move down the corridor and take on new enemy as they appear from behind walls. There will be a small pack of 4 scurry bots when you get to the halfway point. When all the bots are dead go back and use science on the 3 terminals to restore the power plants. A neat little secret area can be found on the west wall where you can crawl under an overhang to find 2 lockers. The far north locker is harder to pick and has a pulse rifle in it. Head back to the elevator and take it downstairs.
6. I have to say this mission wasn't that hard but that is mainly because of my custom squad of 2 robot Barnakys!
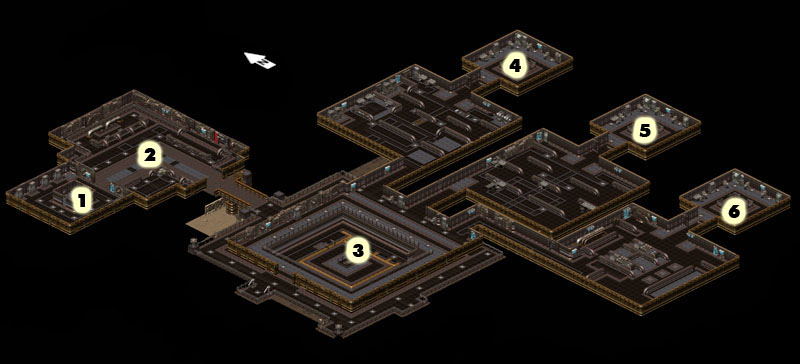
1. Entry - Elevator
2. Barnaky Room
3. Calculator & 5 brains
4. Artist Brain
5. Scientist Brain
6. Politician's Brain
1. So now you are finally ready to meet the Calculator! Is he a Casio, TI, or HP? We shall soon see.....
2. Exit the elevator and carefully peek around the corner. You should see General Barnaky and he will see you and he is pissed. Hopefully you have the holodisk letter to his wife in your possession. If so he will only beat up on you for a short while. Then he will say he's sorry and wander off. Unfortunately he won't join you in the fight. Use your snipers to attack the 7 humanoid robots in the next room. Two of them are armed with rocket launchers, 1 with a vindicator and the rest with plasma rifles. They all stay behind half-walls. After you destroy them move on to the bridge to the south. There are 4 turrets guarding it so try to take them on one at a time by positioning yourself in the Barnaky room.
3. Now go to the Calculator. Once you enter the room his shield pops up so he cannot be killed. You will need to destroy all 8 brains first. Kill the 5 nearby first then the door to the Artist's brain will open. Take on the 6 humanoid bots and 2 turrets inside. One bot has a gauss rifle and one is armed with a rocket launcher. Two of them will rush you. Kill them and then use the terminal to open the door to the brain and kill him which will open the door to the Scientist.
4. In the Scientist's room there are 4 bots armed with plasma rifles and 2 that will rush you as well as 2 turrets. Kill them and do the same thing to the Scientist's brain to open the last door to the Politician's brain. This last room will be guarded by 2 bots with rocket launchers, 2 with vindicators and 2 with plasma rifles as well as 2 turrets. You can now assassinate the politician's brain which will drop the shield surrounding the Calculator. The Calculator threatens to kill you with 10 behemoth unless you give it one of your squad's brains. You are given 60 seconds to make a decision.